Thursday, November 18, 2010

A Berry Good Sauce for the Holidays

Cranberries on a slow simmer.
Cranberries as most folks know them.
This sauce makes a nice holiday gift too
 As Thanksgiving approaches I am trying to take the proactive approach & make as many things ahead as I can so I am not in a rush on the day of our big feast. No holiday meal would be complete without homemade Cranberry Sauce. I've had an infatuation with cranberries since I was a kid.  We lived in Alaska for several years & we used to enjoy picking wild berries as a family. Alaska has endless varieties of berries & actually more than one variety of cranberry.  My mother used to make jams, jellies, syrups & baked goods with the fruit.  The wild cranberry is much smaller than the variety we often see in the store which are commercially grown for sauces & juice. Whichever you are most familiar with this sauce is both simple & perfect for holiday entertainment. 


Lemony Cranberry Sauce
1 (12- ounce) bag cranberries, fresh
3/4 cup white sugar
3/4 cup water
1/4 teaspoon salt
1 Lemon juiced & seeds removed then dice pulp
1 teaspoon fresh lemon zest
1/4 cup of Paula's Texas Lemon Liqueur*
1/8 teaspoon, fresh grated nutmeg
1 whole cinnamon stick**

Rinse cranberries, place in large saucepan along with water, sugar, lemon juice, lemon pulp, lemon zest. Bring berry mixture to a low boil, once the berries start to burst then reduce heat to slow simmer.  Add Lemon Liqueur, nutmeg & whole cinnamon stick.  Simmer about 20 minutes, stirring frequently.  Once the mixture has a syrup like texture & all the berries are soft then remove from heat & cool to room temperature.  I like to make this 1 week before holiday meal.  It keeps for 2 to 3 weeks & tastes better a few days after it sits chilled.  Leftover sauce freezes well. *Paula's Texas Lemon Liqueur also has an orange liqueur which is good for this recipe.  **The cinnamon stick can be left in till served as it imparts a slight spicy flavor.

Thursday, October 28, 2010

Tuesday Tacos, true Gulf Coast Flavor!

I see fish tacos as a very Baja Mexico creation, in recent years I have noticed them appearing many menus across Texas as well.  The fish can be grilled, fried or seared but however it is prepared they are almost always enjoyable.  I used to rate a good Tex-Mex restaurant on the enchiladas & salsa alone, now I guess the establishment had better be on the game with the Fish Tacos too! The fish must be super fresh.  We are fortunate to have fresh Gulf seafood nearly at our fingertips here in Texas.  (You can substitute any fresh fish of choice.) I added one of my favorite fruits to these tacos.  We are just now finding fabulous pomegranates here in the markets.  I even have some small pom varieties in my garden however they are not ready yet to eat. This week on Tuesday we had Fish Tacos with a twist of course. The combination of Pomegranate & Jalapeno give these Fish Tacos a real star rating in the Texas to Mexico household.  Like most tacos they are pretty fuss free & easy to prepare. They make a perfect dinner for a night of things that go bump in the night & trick or treating!  Enjoy my friends & buen provecho!

Gulf Coast Fish Tacos
1 1/2 lb *Gulf Sea Bass, *any fish of your choice is great
1 Pkg Louisiana Fish Fry
2 cups vegetable oil
1 cup Guacamole
1 cup chopped cabbage, either red or green
1 Jalapeno pepper, seeded & diced
1 Pomegranate, Seeded
Fish Taco Sour Cream dressing
1 cup sour cream
1/ 4cup milk
2 Tbsp lemon or lime juice
1 Tbsp garlic powder
1 Tbsp oregano or cilantro, chopped fine either dry or fresh
Pepper & Salt to taste

Fry Fish dipped in to the Louisiana Fish Fry,  in 1 1/2 inches of oil, I used favorite cast iron skillet over medium high heat. Cook time for fish while frying: 4-5 minutes, turning once during the frying process. The fish should have a crisp texture on the outside & have a nice golden color.  The fish should easily flake once it is cooked. (do not over cook) Drain the fish on paper towels, keep warm in oven preheated at 225*.  Heat corn tortillas thoroughly, on comal or griddle.

Assemble the Fish tacos placing a layer of guacamole on the bottom of the tortilla, add few tablespoons of cabbage, piece of fish, top with Sour Cream Sauce (recipe above) then sprinkle liberally with the pomegranate seeds.  I served this with Spanish Rice & also garnished that with the red pomegranate seeds.

 Louisiana Fish Fry is our favorite fish fry.  When I attended college in Louisiana these products earned my eternal favor!  What goes better with Gulf Seafood?  If there is a product out there I haven't found it yet but still open to try new things! Let me know what your favorite Fish Fry is? 

Saturday, October 23, 2010

Family pizza night kneads to start with the right dough.


I've heard interviews which quote New Yorkers as saying that the secret to great crust is the water in New York. I really don't know about that "true-ism" but the water here seems to work out quite well when we have Family Pizza Night in Texas. I believe the real secret to great crust is the joy one gives or receives in feeding a crowd & satisfaction of a yeasty crust filled with favorite toppings. We recently had Pizza with Bytes from Texas as she used some Foodbuzz Tastemaker products from Fresh Express. The pizza toppings she used were wonderful (especially the BLT!!) & I took the pizza dough over providing the 2 crusts. New York or Texas it is all the same when sharing food with those you love. Last evening we made homemade Focaccia bread which we made using a variety of fresh local ingredients & is posted on our Fresh from the Heart of Texas blog. Fall is in the air at the local Farmer's Market & we are sure to find more tasty toppings for both Pizzas & Focaccias. For your own Pizza night try the Pizza Dough I prefer.


Pizza Dough for 2 Pizzas

1 pkg. active yeast*
1 1/4 c. warm water
2 tbsp. cooking oil
4 c. flour
1 tsp. salt
1 tsp. dried oregano (optional)
1 tsp.
Dissolve yeast in warm water, stir in oil. Sift flour and salt together and stir into first mixture. Knead for 15 minutes, loosely cover with plastic wrap. Allow dough to rise until doubled in bulk.(Approximately 2 hours) Makes 2 pizzas. Divide dough in half, work with 1/2 the dough at a time on a lightly floured surface. Shape dough into circle/ball then either stretch into the round pizza shape or roll with a floured rolling pen. Place onto a bread baking stone which has been lightly dusted with cornmeal or lightly oiled pizza pan. Either way this crust is a very light New York style crust. Add your sauce and desired topping. Bake at 425 degrees for 15-20 minutes.
*Proofing the yeast: for this recipe I proofed my yeast, I dissolved the yeast, water, sugar, salt & 1/4 cup of the flour for the recipe into a small glass bowl & let it rest 20 minutes. This proofing created a nice spongy yeast mixture which assured me the crust would rise well. When taking this step remember you have already used 1/4 cup of the 4 cups of flour & adjust accordingly.

Hungry yet? Don't forget to check out the Focaccia at Fresh from the Heart of Texas!

Tuesday, October 19, 2010

Natchitoches meat pie, the original hot pocket.

Think comfort food to in the 1700's in Louisiana & you might well be dreaming of the Natchitoches Meat Pies; that's pronounced (NACK-uh-tush) for those less familiar with Louisiana names & places. These tasty meat pies are a hold over from the early Spanish settlers in the Louisiana territory. Which is to say they were similar to beef Empanadas & were taken literally across the Spanish empire by early settlers. We often dined on Empanadas in Mexico which were very much like these "north of the border" meat pies, hence my addition of Chohula hot sauce to my meat pies! These days you are likely to find the meat pies at the New Orleans Jazz festival, a football game or at a boucherie deep in the heart of Cajun land. Sometimes they are called Cajun meat pies but whatever one says about them they are a crowd pleasing, taste tempting pastry filled with meat & spices. Natchitoches meat pies are great for a main dish with a salad or as an appetizer. They need nothing other than a napkin to catch any filling which may tumble out however I made an easy Avocado dip we thought was perfect for these treats.


Natchitoches Meat Pies

for meat filling
1 1/2 lb ground beef
1 1/2 lb ground pork
1 c chopped green onions
2-3 cloves garlic
1 tbsp salt
1 tsp red pepper flakes
1 tsp coarse black pepper
1/2 tsp cayenne pepper
2 tsp Sherry vinegar
2 tsp hot sauce, Cholula, Tabasco, etc
1/3 c flour
Combine all ingredients except flour & cook till meat breaks up and is no longer red. Sift flour over the meat mixture , mix well, remove from heat. Drain meat into a colander, cool to room temp.
Crust:
2 2/3 c flour
1/3 heaping solid shortening
1 lg egg
3/4 c Milk
Vegetable oil for frying pies
Sift flour, use pastry cutter&cut shortening into flour. Mix in egg & milk. Form dough into a ball. It will be semi sticky.

Flour board and rolling pin. Rolling out about 1/3 of dough at a time roll about 1/8 in thick. Cut into 5in circles (use coffee can or similar size) To assemble pies place heaping spoon of filling dampen edge of pie dough with an *egg wash & seal shut then prick each top twice. These can be frozen or fried in deep fat fryer at 350 degrees. Drain on paper towels, serve warm. *Yolk of 1 egg + 1 tsp H2O, beaten & then brush on the inside edges of dough before pressing edges shut & crimping.


Avocado Horseradish Dip

2 large ripe avocados, peeled and pits removed
2 Tbsp Milk
16 ounces sour cream
4 Tbsp prepared horseradish*
2 tsp garlic, peeled & coarsely chopped
3 green onions, chopped (or)
*1 small shallot can be used
juice of 1 fresh lime
2 tsp Cholula hot sauce

Place all ingredients in blender or food processor & chill before serving. *I use the prepared horseradish found in the deli, do not use a horseradish spread which is more than horseradish. It is less pungent & has less bite to it for this recipe.

This dip was so good we even tried it with chips & veggies. Oh, the possibilities any dish with an avocado presents...

Thursday, October 14, 2010

The "un-birthday cake"


A very merry unbirthday to you


Our youngest daughter has always been the "un-birthday" cake girl! When she was little she would stick her fingers in the frosting & pose for those cutesy photos parents have of their toddlers. You know the pics with the fingers dripping with sugary sweetness. In truth though when she was able to express her opinion at birthday events she never wanted a birthday cake. She was that kid at a birthday party who didn't want a sugary piece of birthday cake loaded with frosting. The "un-birthday cake" girl ate Cookie cakes for years. Now that she is older she actually has a little more variety in her dessert repertoire but still manage to keep it simple. When she had a birthday this week I stumbled upon a great idea for a small gathering birthday celebration. Why not make a loaf pan sized birthday cake? Our family tends to have a birthday every 4 weeks in the summer & fall. We get overloaded on cake to be honest. The smaller sized cake seems like the perfect way to celebrate & have our cake too! Why did it take me so long to come up with this "small un-birthday cake" idea?


Lemon Pound Cake
1 2/3 cups all purpose flour
1/2 teaspoon baking soda
1/2 teaspoon baking powder
3 large eggs
1 cup sugar
3 Tablespoons salted butter, softened
1 teaspoon pure vanilla extract
1 teaspoon pure lemon extract
1/2 teaspoon Paula's Texas Lemon Liqueur
Juice from two medium lemons (approx 1/3 cup)
1/2 cup vegetable oil
Preheat oven to 350 degrees.

Grease & flour a 9x5 loaf pan well. (I used a Nordic Ware loaf pan with many nooks & tiny spots) make sure to get the entire pan greased & floured so the cake will have nice clear definition.

In a medium bowl sift flour, baking soda, and baking powder.

In mixing bowl or stand mixer, cream butter. Add sugar, eggs, vanilla, lemon extract, lemon juice and oil until mixed well.

Gradually add dry ingredient mixture to your mixer and blend until smooth.

Pour batter into prepared pan and bake for 45-50 minutes or until wooden skewer comes out clean. Edges should be golden brown & will continue crisp upon cooling.

Let cake cool before spreading the icing over the cake.


Ingredients for Lemon Liqueur Icing

1 cup plus 1 teaspoon powdered sugar
2 Tablespoons whole milk
1/2 teaspoon pure lemon extract
1/2 teaspoon Paula's Texas Lemon Liqueur
For icing blend powdered sugar, milk, and lemon extract & Lemon Liqueur until creamy. Ice the top of your cake and let the icing drip down the sides of your pound cake. Let icing set on the pound cake before slicing.


When making a flavored Pound Cake try using a local liqueur. Austin Texas has many local flavors but this one really caught our interest & has so many possibilities. Paula's Texas Lemon Liqueur also has a delicious Orange Liqueur.

Friday, October 8, 2010

Brave Potatoes on family Tortilla night.

In Mexico the simple tortilla is at times a spoon, a plate as well as bread. The contribution of the tortilla to the cuisine of Mexico is irrefutable & there is really no way to describe the flavor of a handmade tortilla hot off the stove. Whether you enjoy corn or flour the one thing you should do if only once is to try making your own tortillas.


Last weekend we had family Tortilla night. Bytes from Texas, (one of my daughters) served up a menu of Fajitas, roasted corn & my Patatas Bravas all of which required fresh tortillas. The highlight of the evening was when my daughter's boyfriend made flour tortillas the way his Grandmother taught him to make them. Nothing was measured, everything was by feel & touch. It was almost therapy watching him figure it out with a pinch of this & a handful of that. His flour tortillas were perfect. I on the other hand used Masa Seca for my corn tortilla dough. Masa in Mexico means "dough". The true masa is made from field corn, called maiz blanco or "cacahuazintle" which was dried, treated with a lime water solution, then ground. For a few dozen tortillas I will always start with a quality Masa Seca. The masa can be used for corn tortillas or for tamales.


Flour Tortillas
3 cups unbleached flour
2 tsp. baking powder
1 tsp. salt
4-6 Tbsp. vegetable shortening or lard
about 1 1/4 cups warm water

Mix dry ingredients in a large bowl.

Add vegetable shortening or lard. (Or use a combination of half lard, half shortening.)
Use a fork or a pastry cutter to cut in the shortening or just do it the old fashioned way and use your hands.

Next add warm water a little at a time until your dough is soft and not sticky. You do not need very hot water.
Knead the dough for a few minutes.

Let the dough rest a few minutes then divide the dough into 12-15 golf ball sized round balls. Heat the comal (griddle) to medium high heat. Roll out with a rolling pin or press the tortilla dough between two pieces of wax paper & press in a tortilla press.

Lay the tortillas on the comal & cook for brief 20-30 seconds or till they brown slightly. As the tortillas cook they will develop brown specs on the tortilla. Wrap the cooked tortillas in a fresh tea towel & keep warm in a basket or tortilla keeper till all the tortillas are cooked.

Corn Tortillas


2 Cups Maseca Corn Masa mix
1/2 teaspoon Salt
1 1/8 Cup Water

**Use the same process as above for the flour tortillas but keep in mind that the corn dough will be more dense to work with. There are very good instructions on almost all masa packages. The reason many people use pre-packaged masa is that finely milled masa is perfectly ground for making corn tortillas.


The process of tortilla making can be a family experience. There is something for everyone to do.


This potato dish is unique to Spain. Often served with a simple glass of wine in as a tapas dish in bars throughout Spain. It is as commonplace in the countryside as it is in the big city restaurants. The potatoes can be eaten as a side dish or appetizer with toothpicks on small plates. The "Bravas" or Brave title comes from how brave one may have to be to eat this spicy potato dish. However you decide to try this dish remember both the heat & the amount of paprika are up to the discretion of the chef! It is a great addition to any Mexican meal.


Patatas Bravas

* 3 Tbsp olive oil
* 4 - 5 Lg Russet potatoes, peeled, and cut to 1-inch cubes
* 2 tablespoons minced onion
* 2 cloves garlic, minced
* Salt & Pepper
* 1 1/2 tablespoons Spanish paprika
* 1/4 teaspoon hot sauce
* 1/4 teaspoon ground thyme
* 1/2 cup Ketchup
* 1/2 cup mayonnaise
* 1 tbsp. sherry vinegar
* Chopped parsley, to garnish
* 1 cup olive oil, for frying

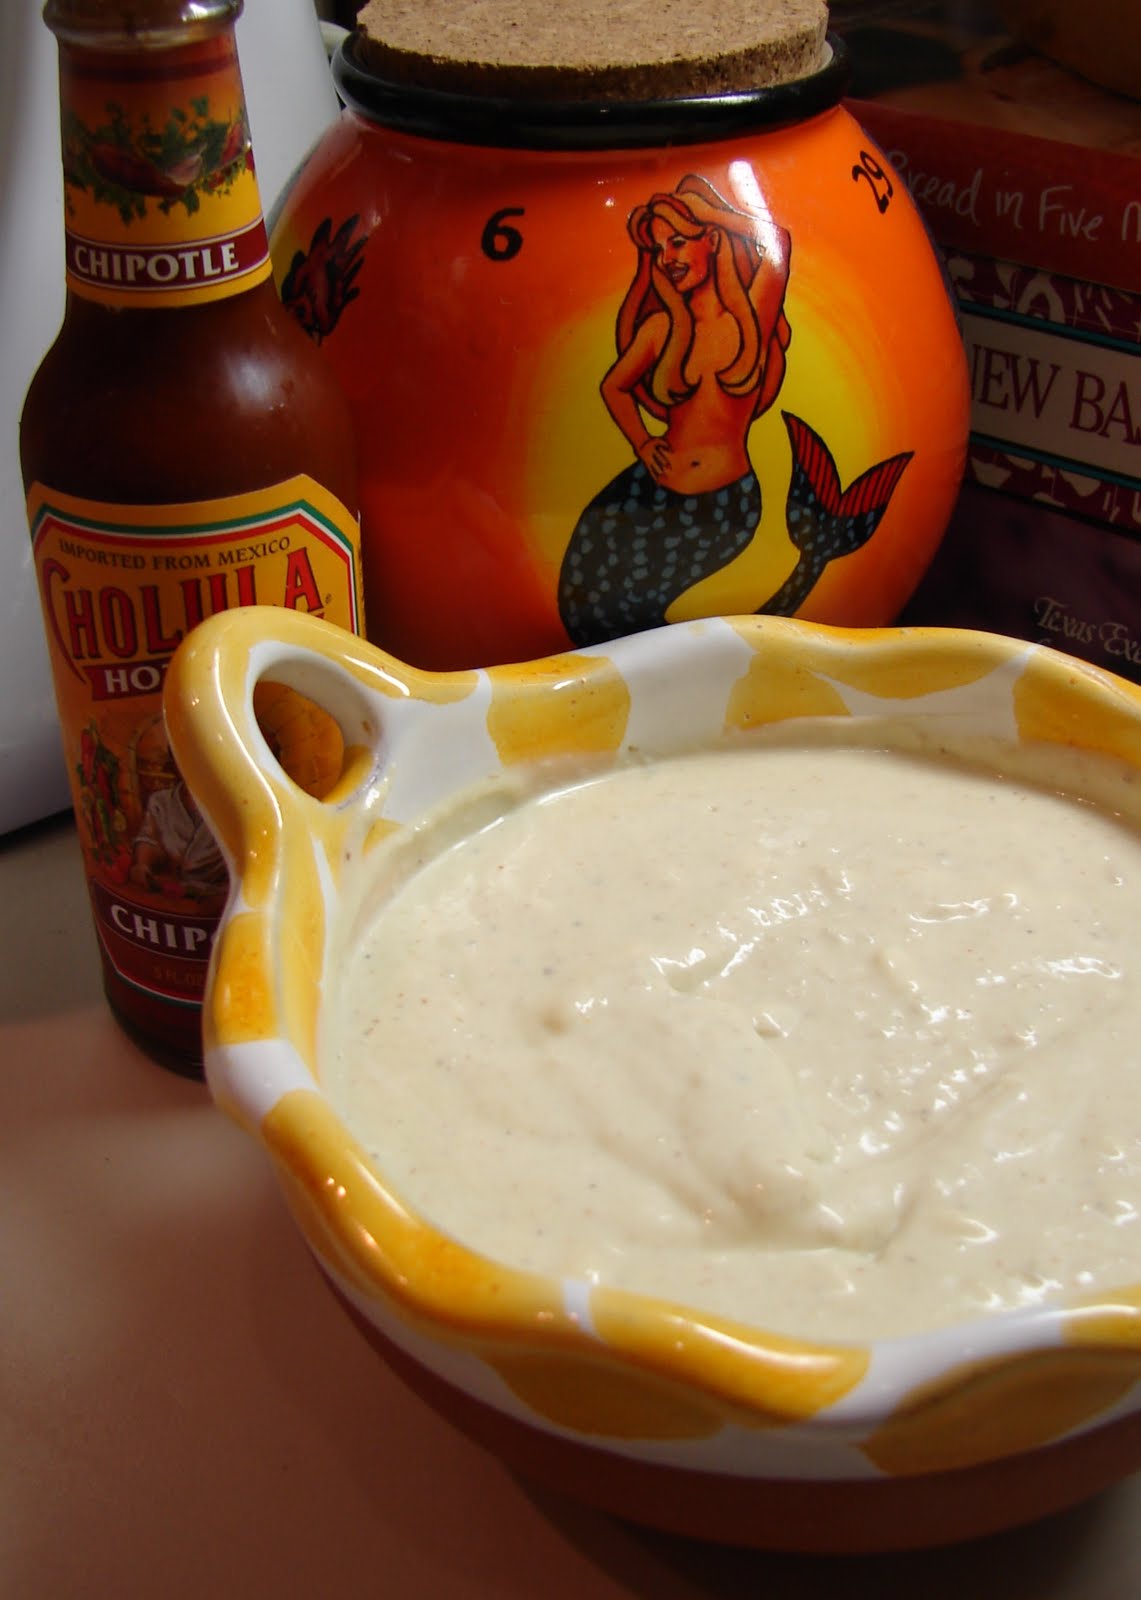
In a saucepan, heat 3 tablespoons olive oil over medium heat. Add the onion and garlic cook until the onion is soft. Turn off the heat, and add the paprika, and thyme, stirring well. Transfer to a bowl and add the ketchup and mayonnaise, sherry vinegar & Tabasco or preferred hot sauce. Season with salt and pepper to taste. Set aside.

Sprinkle the potatoes lightly with salt and black pepper. In a large skillet fry the potatoes in 1 cup olive oil until cooked through and golden-brown, stirring occasionally. Drain the potatoes on paper towels, check the seasoning, add more salt if necessary, and set it aside. (*if you wish to use other vegetable oil it is fine but the olive oil imparts a nice flavor on this traditional dish. )


Keep the potatoes warm & pour sauce over them while warm. Serve immediately.


If you are lucky enough to have any left the next morning be brave & serve them with eggs & tortillas.

Sunday, September 12, 2010

Who, why and the simple Torta.


I am competing in the Project Food Blog Challenge by Foodbuzz, for our first challenge, each competitor is asked to create a post that defines us as a food blogger. My blog was born out of Expat need to blog & therefore reach out to others from a quiet spot in a desert in Northern Mexico. Most of you read this in my previous "Blogiversary" post. That certainly doesn't describe the reasons phrases like demi-glace, stock, reduction or taste before you season have impact for me or have had meaning most of my life.


The main & simple reason can be narrowed down to a place & 2 people who have had profound effect at how I look at food. I lived as a child in a fabulous city which was & still is a cultural hodgepodge of sights & flavors. Most people who visit San Antonio Texas today have visited "El Mercado" in downtown San Antonio think of it as a fun touristy attraction which has restaurants & shops. It is now more commonly known by the gringo name of "Market Square". When I was a child it was the very encapsulation of food & where people actually shopped for vegetables, fruits & seasonings in a true farmer's market setting...long before farmer's markets were "trendy". There was even a wonderful shop in El Mercado which till the early 1980s still sold chili powders, cumino & other authentic Mexican seasonings as well as hierbas. We could also find the standard fare one would see in a Mercado south of the border in Mexico. El Mercado made a leap to prosperity at some point in the 1970s with Urban Renewal some of those more simple traditions by the wayside. I still enjoy going to El Mercado, the experience though never fails to dredge up memories of going there as a child even if I am partaking of those touristy margaritas & ogling the colorful pinatas. San Antonio for me is all about the food. San Antonio is a big part of my Food heritage.
My earliest memories as a child are of my Grandfather(check out the vintage photo of him serving customers at Ft. Sam in San Antonio, Texas, late 1940's). He worked most of his life in restaurant business in San Antonio Texas. He would have the entire family over for Sunday dinner. His meal repertoire was simple & yet truly wonderful. He would made an incredible Yankee pot roast, though I hardly think he called it that. As I grew older he told me how to reduce, thicken that roast gravy or even darken it with coffee if need be. He also made large pots of old school Italian Spaghetti Sauce much like the old fashioned Brown Sauces from the 1940s. My Grandfather would strain the sauce, correct the seasoning & then strain it again. Granddaddy was a very practical man but he always tossed out the bits & pieces we now keep in our contemporary Spaghetti sauces. Back then every process he used was like a slow, methodical dance step in the small kitchen. My mother on the other handmade made use of everything she had. She truly must have lived that phrase in the kitchen "waste not, want not". She used everything at her disposal, never throwing out a key ingredient, which created a continual feast. She made flavorful cornbread with grains of corn, jalapenos & cheese. That is common enough now but in the 1960s it was cutting edge & unique. She made frijoles & chilis which were legendary. When our family moved to Alaska she learned how people there lived off the richness of the land & cooked accordingly. As part of that experience our family would go out collecting mushrooms & berries where we learned what was ripe, flowering or non edible. We ate the best fish & game my father would bring home as is still commonplace in the 49th state. In this day it is rare when I am lucky enough to encounter a morel mushroom or a high bush cranberry but knowing the differences in such things at a young age made me the cook & food blogger I am today. The travel to or living in other countries as an adult has just been the cream on the coffee. Travel changes you, people touch you but it is the flavors which feed your soul.


To celebrate the start of Project blog I thought I'd post an easy recipe of a typical Mexican street food. Between Texas & Mexico so many of these foods could sum up who I am & my inner foodie philosophy. I love simple, hearty & food which make an impression on the palate. Those very impressions don't have to be expensive or extravagant to hit the mark. These simple sandwiches became very popular in Mexico around WWII. (I have checked this story out with several sources & all say the same thing) They are a very hearty sandwich which truly could keep a hungry working man or woman going for hours till the traditional late evening dinner hour in Mexico. While we lived in Mexico I marveled at how many varieties of these sandwiches I saw & how virtually any street corner might have a Torta vendor show up mid-day with a steady stream of customers well into the late afternoon. I am so glad I discovered the original "Belt-Buster" south of the border! Is there anything more portable or satisfying as a simple Sandwich?

How to make a Torta:

Use Bolillos Rolls found at a Latin American Market
2) Cut it in half, scoop out a little of the actual bread. (the roll can actually be toasted)
3) Spread the bottom half with a thin layer of refried beans
4) Layer sliced or shredded cold pork or beef. Leftover roast is perfect for this sandwich.
5) Use any or all of the following ingredients for the filling:garnishes such as guacamole, tomato, diced sweet white onion, jalapenos, chopped cilantro. lettuce.
To this squeeze lime & add a squeeze of mayo or Mexican. Give yourself time to finish this meal & plenty of napkins or share this generous sandwich.

Friday, September 3, 2010

A Boom Boom Blog-i-versary

A Blogiversary seemed like a great occasion to ponder the past four years and roll out another meal featuring Boom Boom Enchiladas at the Texas to Mexico house.

I'm reflecting this week as I celebrate my 4 year Blogiversary of Texas to Mexico. Thanks to leaving Texas in 2006 & heading off to the arid, dusty desert of Mexico I can now look back at a 4 year Blogging adventure. Back then I desperately needed a way of letting friends & family know about our life south of the border. (That was also shortly before we had a voice over phone & were speaking on a daily basis to everyone back in the states) Little did I know back then posting photos, yammering on about things I saw on my daily travels I would truly broaden my horizons. In truth, taking photos & blogging exposed me to a whole new adventure which extended far beyond Texas & certainly Mexico. I was soon speaking with people in Europe, South Africa & the Middle East. It seemed I had more in common with those people than I had differences. In 4 years I have heard countless times from people who sought advice on making a cultural change or traveling through Mexico. Regardless of the Expatriate Assignment, the lifestyle is certain to change the way of viewing life. My viewpoint was forever changed. Back then as now as I toured the blogging world, I sought to broaden my horizons & expand my world. In 2006 I added a recipe here & there mostly discussing the life or people around me. My blog followers have been with me through astounding shopping experiences, visa & passport photo mishaps (exhibit below, yikes!! Those {bad hair, señora ninguna sonrisa} FM3 photos were awful.), dangerous border crossing incidents & horrifying hair coloring disasters which one can only appreciate fully once cyber friends say they understand it will all work out. For these things I want to say thank you. You have fed my soul & spirit from Mexico & back to Texas. In turn I hope I have done the same in Texas to Mexico.


To celebrate my 4 year Blogiversary I thought I would make a slight variation on one of my favorite Tex-Mex Enchiladas I have eaten many times at Chuy's. Chuy's is an Austin original restaurant which celebrates 2 things I can both appreciate & enjoy. Each year they celebrate Elvis Presley's Birthday (January 9) &
Green Chile Festival. Not only do they celebrate but they do it in wonderful style with an array of menu items on both occasions to make everyone a follower of either Green Chilis or Elvis (for any of those non fans...seriously??) I hope all the Texas to Mexico fans will be sure to try this recipe or drop into a Chuy's location near you to taste the original Chicka Chicka Boom Boom Enchiladas. One taste of that Boom Boom sauce & even non believers will be Green Chili fans.


Boom Boom Blogiversary enchiladas were great with Golden Corn Salad with Fresh Basil from Sept. 2010 Cooking Light check the recipe out here:


My variation on the familiar "Chicka Chicka, Boom Boom Recipe" involves little more than using jalapenos versus serranos & I made more of a filliing for the tortillas rather than using the chopped roasted chicken. The filling adds a little more moisture to this version.


Boom Boom Chicken Enchiladas (slight variation**)

12 white corn tortillas

1 1/4 lb chicken cooked, roasted, fork shredded

1/4 c. diced yellow onion

8 oz. cream cheese or queso panela (Mexican cheese)
1/4 tsp. ground cumino
salt, pepper to taste

Boom Boom Sauce ingredients
1/2 c vegetable broth

1/4 c water

1/4 T each salt and pepper

3/4 lb roasted Hatch Green Chilies

2 oz tomatillos
1 1/2 oz cilantro
1 oz green onions
3/4 oz minced jalapeno peppers

1/2 oz lime juice

1 1/4 lb American cheese

additional mixed shredded cheese for topping

In a saucepan, add vegetable broth, water and spices and place over a medium to high flame. Using a food processor, puree roasted green chilies, tomatillos, cilantro, green onions, jalapenos and lime juice. (This entire mixture also works well with an immersion blender or standard blender)

Add to saucepan, stirring in well. Bring mixture to a slow boil. Lower flame and slowly add American cheese, whipping as needed to remove clumps and make sure it doesn’t stick to the bottom. When the cheese is melted and mixed, remove from heat. Yields 1 Quart.

Prepare mixture for enchiladas filling: Roasted chicken, fork shredded, mix with queso panela (or cream cheese), 1/4 cup of onion, diced. To make enchiladas, fill a corn tortilla* with 3 Tbsp of cooked, roasted chicken mixture. Roll up and place in a lightly oiled baking dish (9X15). Top with mixed cheese, as needed. Warm in a hot oven for 10 minutes, until cheese is melted. *I steam the tortillas briefly so they will easily roll. Top with Boom-Boom Sauce.

**First published as SAL HERNANDEZ / CHUY'S MEXICAN RESTAURANT here:

***On a very personal note, our first assignment in Mexico seemed to be at the epicenter of extortion, kidnappings & gunfights following the election of President Calderon & his declaration of war on the drug cartels. While these things were gripping we never felt more at home or cared for among an entire group of warm & friendly people. We continue to miss & pray for our friends in Mexico each and every day.

And last it is with a well known quote that I leave a thought for my friends & family in Mexico:

The democracy will cease to exist when you take away from those who are willing to work and give to those who would not. -Thomas Jefferson

Wednesday, August 18, 2010

Cauliflower Zipped up a Notch with Hatch Chili

Is your food spicy & hot or just hot? We had an experience last weekend where we thought we'd figured out the heat level of some jalapeno peppers. I seeded & de-veined them however once the peppers were pulled off the grill we were all crying from the pain. (literally!! Did something happen to this late summer jalapeno crop? We love them but seriously way past habanero heat level these peppers were...) The family is not short in the heat tolerance area so we thought we'd better temper the jalapeno intake this week. We opted for the Hatch peppers, a nice spicy change of pace after the over the top jalapenos. (the smoke is still drifting from my ears...) As the saying goes: “Variety's the very spice of life, That gives it all its flavor” and so I was in search of flavor with or without that tall glass of ice water close at hand~ For a kinder gentler jalapeno recipe check out our New Blog at Fresh from the Heart of Texas.


Hatch Chili festivities have begun here in town. While we are a lengthy drive from New Mexico, Texans do love a good spicy chili & a reason to celebrate. At several local stores around the area, the large roasters full of Hatch Chilis are set up outside (in our 100+ summer temps) searing those Hatch Chilis. The peppers can be purchased fresh or straight out of the chili roaster.
Inspired by a side dish challenge from fellow blogger Cinnamon Spice & Everything Nice I searched for a way to incorporate one of my favorite spicy peppers into a side dish. Not to be a double dipper but I also follow Gloria Chadwick's blogs & love her Hatch Chili Heaven blog where she is positively green about all things Hatch. She inspired me to zip up the spice in my Cauliflower dish. Searching through several cookbooks I came across an Indian recipe which blends a wonderful array of spices & flavors into a thick flavorful sauce topping cauliflower. While I enjoy the flavor of several curry mixtures, Mr Texas to Mexico is not really a fan. I am however happy to say this sauce contains no curry blend. The tomato, ginger & garlic sauce really create a magic that can transport even an average menu into something exciting with a head of cauliflower. The heat in this dish can be taken up or down depending on what your preferences are.

Two books I've been reading are: The complete Hot & Spicy Cookbook & on the Chile trail, 100 Great Recipes from Across America. ( a birthday gift from Hornsfan) The last by Coyote Joe, also known as Mad Coyote Joe Daignaeult. I can recommend both books & believe the Hot & Spicy cookbook goes a long way towards helping cooks decipher some of the special ingredients involved in cuisines of 5 different countries featured in the book.


Cauliflower for me is great steamed with a squeeze of lemon & pepper...that was before I tasted this recipe.


Chili Roasted
Cauliflower
3 Medium Tomatoes. sliced
3 cloves of garlic
1/2 inch of peeled, sliced, ginger root
1 medium onion, cut into wedges
2 Tbsp. Ghee, or clarified butter
3/4 tsp. ground turmeric
1/2 tsp. ground chili powder
1/2 tsp. garam masala
1 c. peas, if frozen thaw
1 Hatch Green Chili, seeded, diced
1/2 tsp. salt
1 Med. Cauliflower, cut heart out & blanch

Blend tomatoes, onion, garlic & ginger in the blender forming a nice paste. Heat butter or ghee in a skillet over medium heat, add the paste, turmeric, chili powder, garam masala. Stir fry until the paste & spices separate. Mixture will be pulling away from skillet & have loose texture to it. This process takes 5-6 minutes. Add the peas, Hatch Green Chilis & salt then continue to cook 4-5 minutes more, stirring constantly. Remove from the heat. Place the Blanched Cauliflower in a large ovenproof dish, pour the spices over it. Place in preheated oven *375 for 30 minutes or till the Cauliflower is the texture you want it. I like this vegetable to maintain a crisp quality to it. Serve flat on plate with the spices on the Cauliflower florets. Serves 4, great served with warm nam bread.


Friday, August 13, 2010

Chicken with a savory Gravy~Pollo Guisado


"The fact is that it takes more than ingredients and technique to cook a good meal. A good cook puts something of himself into the preparation -- Pearl Bailey, 'Pearl's Kitchen"


Since our return from living in Mexico I have craved certain Mexican dishes which are not as easily found in restaurants here in the states. Some meals are just good homemade versions of things which are probably comfort foods in any culture. Any one dish meal that a cook puts their heart & special touch to has bound to be well recieved. Pollo Guisado is just that type of meal. A Mexican comfort food. Like your Grandmother's steak & gravy or Chicken & dumplings, Pollo Guisado translates to Chicken in Gravy. Simple & hearty this poultry dish is easy and hits home with the depth of flavors as well as being an all in one pot meal. Browned chicken, an easy roux and veggies are all that are needed for this Guisado.
This summer I have had a bounty of tomatoes & peppers from the garden which are an essential part of this dish. Moreover making this meal gave me reason to travel to a favorite grocery store to pick up a few extras for this dish.
On a recent trip to our local Fiesta Mart grocery store my daughter Bytes from Texas & I found Yoki Cheese bread mix (Pan de Queso) a typical Brazilian preparation for a very tasty cheese bread. There are certainly recipes I could try to locate for this bread but we had very much enjoyed the unique warm bits of bread during an evening we spent at Fogo de Chão. Upon finding the boxes of Yoki mix we added them to our shopping cart without another thought. Any foodie knows that a trip to an ethnic grocery store can yield astonishing surprises. Keep an open mind & don't miss a single aisle. We have been shopping Fiesta Mart for more years than I can count & I am always amazed by some new product I've never seen before. We will continue to scour the local stores & shops keeping up with current trends & flavors. Some of those adventures will bring us here to the New Blog, Bytes from Texas & I have started. Enjoy the last days of summer & buen provecho~


Simple ingredients can scent the kitchen with flavors that satisfy & soothe.

Pollo Guisado

4 Tbsp Oil
2 lbs fryer parts, or Chicken thighs (your choice)
1 tsp salt
1 tsp pepper
1 cup diced yellow onion
1 large seeded, sliced red or yellow bell pepper
1/2 cup diced fresh tomatoes
1 clove garlic, minced
4 Tbsp flour
1 tsp ground cumino
1 tsp fresh or dried thyme leaves
2 cups chicken broth
1 cup tomato sauce*el Pato brand with chilis is preferred,
(found in Latin American grocery stores)

Sprinkle chicken parts with salt & pepper tossing so the seasonings are coating the chicken. Saute the chicken parts in oil in a deep Dutch oven over medium heat. Brown chicken for approx 15 min turning so that the pieces are evenly browned. Set the browned chicken pieces on a plate & scrape up bits which may be at the bottom of the Dutch oven. Those bits are just an additional flavoring to the roux which you make next.
Saute the garlic in the oil, browning slightly before adding in the 4 Tbsp flour & then brown oil, flour mixture till it attains a "tawny brown" color. Add the onion, peppers & fresh tomatoes. Stir continually so this mixture does not burn, scrap any pieces which stick to the bottom of the Dutch oven, cook 2-3 min.
Add in slowly 2 cups of chicken broth, mixing continually, to this add the tomato sauce, cumin & thyme. Place the Chicken pieces back into the Guisado/Gravy. Bring all of this to a slow simmer. Cook approx. 30 - 45 minutes. The chicken will be very tender & flavored with the rich gravy once it is ready to serve. If the gravy reduces, add a little more chicken stock. Skim any excess oil off the Guisado-Gravy. (Grease is not gravy) Serve this hot with either tortillas, french bread or cornbread. Enjoy!

*I cooked this dish with Chicken thighs because the moist dark meat tends to have a little more flavor for a Guisado.
Shopping a Latin American or Grocery store can yield many surprises, try something new to give a standard dish a new twist. My daughter & I frequent a large Latin American grocery store here & found easy to prepare Yoki cheese bread mixes such an great "go to" addition for a weeknight meal. (they are gluten free too!) If you cannot find Yoki Cheese bread but would like the mix you might check here.

Tuesday, August 10, 2010

Summer Pico, New Blog & Cooking Inspirations~


Food & Family have close connections in our home~


After a Summer of rushing about, having company & life in general I am very much behind the curve with my blog. I have had much
time during the off-blog time to get together with Bytes from Texas & come up with a mother daughter blogging adventure. We love Farmers Markets & enjoy cooking with garden fresh ingredients we find on our jaunts around the state of Texas. What could be more appropriate than a dual adventure through cyber Foodie world? We named our blog....(drum roll please!!)
Fresh from the Heart of Texas. We thought it most relevant given our location. We will both continue to keep our original blogs posting (from whence it all originated) & just do some postings now & again on the new one when the mood strikes us! In the meantime this summer we have been experimenting with cool recipes from new foods we find. Both of my daughters tend to inspire me in different directions however this one challenges me in the kitchen in more ways than one. She was trying to cook as early as 6 yrs old when she would come in early on Saturday mornings & let me know she had "made something for she & her sister". She was well known back in the day for her microwave breakfast specials. (microwave is the only thing I allowed her to use when Mom was not in the room) She has surpassed herself as a cook and as a young woman & I am so proud of her along with her blogging adventures. Little sister is even heading in the blogger direction. Seems like it has taken hold of our entire family.
We have a contact locally who is growing Thai melons. The flavors are somewhere between cantaloupe & honeydew melon. The Thai melons ripen very quickly from farm to table & my guess is we don't see many of these melons in the grocery store because they would soften quickly & ruin. I am inspired when I see some new veggie or fruit I have never tried to use it in some fun recipe which really makes the flavors pop & the senses come to life. Hope you give it a try & enjoy the new blog~ Fresh from the Heart of Texas from our life into yours.

Mango & Melon Pico de Gallo
1 Mango, peeled, cut off the seed & diced
1 cup of Melon (honeydew or cantaloupe fine), seeded, skinned & diced
1 grapefruit, sectioned & chopped
2 fresh jalapenos, cut into 1/4 in. strips
1/4 cup onion, sliced
2 green onions, chopped
1 tbsp olive oil
1/4 cup fresh lime juice
1 sprig of fresh lemon thyme, leaves only (1/4 tsp)

Combine melon, mango, grapefruit, onions, jalapeno strips & toss with oil & lime juice. Add salt to taste & lemon thyme. Marinate for 3-4 hours in refrigerator. Serve over fish or chicken. I show mine served over Talapia (my fillet was disappointingly thin & frail) but it would be even better over a more sturdy fish filet such as Amber Jack or Tuna. Buen Provecho~

Wednesday, May 5, 2010

5, 6, 7, 8...What a difference a year can make!


Last year's Cinco de Mayo meal was eaten South of the Border. Back then I made an Asian fusion meal which suited my Cinco tastes of the day. I noted in 2009 that Cinco de Mayo is not a holiday celebrated with such exuberance throughout Mexico as it is in the states. In Mexico the holiday is barely a blip on the party throwing scale unless one is in the state of Puebla Mexico. For a review of the holiday check here. This year I tried a more traditional "state-side" route. Living back in the states now we join in with the rest of the Cinco de Mayo, Margarita swigging fiesta goers.


We served our Tacos for Cinco de Mayo with plenty of Guacamole, Salsa, cold Jarritos & Cervezas. Hope your Cinco de Mayo was wonderful wherever you celebrated it. Buen Provecho, Enjoy!

Guacamole con la Bandera
is simply this: Avocado mashed & topped with diced tomato, diced onion & a combination of diced jalapeno (or Serrano pepper)& Cilantro. Guacamole served in this manner throughout Mexico is considered "con la bandera" since it has the colors of the Mexican flag. I serve mine with lime wedges. Let the diners mix in the ingredients they would like.


As I scrambled mid day to place a small pork loin roast in the slow cooker for a few hours I decided to mix it up a bit & cook the pork roast with local favorite, Jardine's 7J Ranch, Campfire Roasted Salsa. It was wonderful over our tacos we made from the pork roast too.


Salsa Roasted Pork Loin
3 lb Pork Loin Roast
1 small Onion. sliced
1/3 cup of Jardine's Campfire Roasted Salsa
1 Lime, juiced
1/4 tsp. Cayenne Pepper
1/2 tsp. Black Pepper
3 Cloves Garlic, chopped

Season the Pork Loin roast with peppers, garlic & place the Pork loin roast in crock pot. Pour the salsa over the top of the roast, lay sliced onions over the top of the roast, squeeze the lime juice over the top & bake on high for 4 hours & 30 minutes. Cool roast approx. 15 minutes, then slice & roughly chop the slices. Serve in corn tortillas with chopped cilantro, dice onion, baby spinach leaves, diced pineapple & Jardine's Campfire Roasted Salsa. We served this on locally made fresh corn tortillas....many tortillas!!
D.L. Jardines has a great online store where you can order this salsa & many more of their products.

Five Ingredient Salad for Cinco de Mayo
1 Avocado, seeded, pealed & sliced
1 Mango, pealed, diced into 1/2 inch cubes
4 oz. Queso Fresco, crumbled or sliced into 1/2 inch bite sized pieces
1/4 small onion, diced
1/2 head of Red Leaf Lettuce, loosely shredded by hand.
Arrange clean lettuce into the bottom of serving bowl then layer on the rest of the ingredients ending with Avocado. Serve with Green Chili Dressing, recipe found in previous blog entry.