Monday, February 27, 2012

Work & Travel While Desperately Seeking Paleo Foods

Malai Kitchen, Midtown Dallas
Determination:the process of something typically by calculation or research. 


First & foremost always travel with a plan. When we lived in Mexico if travel plans weren't in place, wild adventures could occur! It is not so different here in the states. On a personal note there is also less self recrimination when you planned for something if it doesn't work out. I for one try and attempt some self restraint & sticking to a schedule, a diet or plan of some type.  Second, if things don't work out then go to Plan B & Carry  On.  (ie: Get back into the swing & keep plowing ahead.)  I had to travel to Dallas last week for work. While traveling with a fellow Crossfit/paleo eating co-worker we thought we would keep each other on track.  We actually did help each other out in many aspects.  It always helps to have someone in your corner who understands why you don't want bread, dairy, rice is a grain, etc..... The first night in Dallas I met two friends I hadn't seen since living in Monterrey, N.L.  We dined at a wonderful Asian restaurant Malai Kitchen in Midtown Dallas. The restaurant is a fusion of Thai & Vietnamese cuisines with several variations similar to other Asian  cuisines. Finding Paleo eats was no problem there and my friend was a dedicated vegetarian of many years therefore; she too had great choices.  The staff was great at accommodating all of our  different dietary needs.  With a menu full vegetable & protein choices it worked for each of us. I had a wonderful Tom Yum Gung with Black Tiger Shrimp which was sheer heaven. There was an eggplant house appetizer which was so good I am still trying to find a recipe for it. 
 The first morning of our trip however was another story entirely.  We are always fed very well at these events so we assumed that breakfast was served  at our destination the first morning. Seriously don't ever assume when it comes to food & travel.  Take control of specific food requirements. After a few days of semi off the grid eating & drinking I was glad to get back into the swing of things at home. Poor food choices on the road make me more determined to eat healthy & plan better the next time around.


Leftover meat, egg & veggies make a quick meal.
This past weekend I was determined to cook our Paleo foods & feel great (*Did I mention I managed to sit next to 2 folks fighting the late Winter Flu in a stuffy conference room the entire trip?) With throbbing head, scratchy throat & my packs of Emergen-C, I carried on.  Wanting to cook, yet spare shoppers my germs;  I sent Mister Tx2Mx to the store for a couple of essentials. One of the dishes I made was reminiscent of the Korean meals a friend of mine used to make in South Florida.  The use of protein & eggs in Korean food is incredible. I always admired her way of cooking  eggs crepe thin & then slicing it up into delicate bits adding such flavor to the meals. I am a very long way from her skill set however I did try & replicate Bi Bim Bap. The very name is meant to imply leftovers or mixed with rice/rice noodles however the Paleo version certainly doesn't rely on rice or noddles. I opted out of rice & doubled up on the veggies. The efforts yielded a very nice protein packed meal using leftover venison loin, cooked egg along with  multiple vegetables. Cooking the dish in a stainless wok made the process super fast. If I'd had a bowl of this for breakfast in the Big D, I'd have been one happy camper.  Next time Plan B may include where to find the Korean food trailer & will certainly include a return visit to Malai Kitchen.


A bowl of  Paleo Bi Bim Bap is a quick fix for dinner.


Paleo Bi Bim Bap


8 oz. Sliced Leftover meat: tenderloin, roast, steak, chicken, etc.
Egg, I used 1 egg
8- 10 oz. of each Vegetable; I used Carrots, Chard, Cabbage & Bell Peppers
Korean Spicy Sauce or chili flakes to taste
1 tsp. garlic
rice vinegar or lemon juice to taste
coconut or grapeseed oil (with a splash of sesame oil for good measure)
dash of sea salt
sesame seeds
Cucumber sliced or grated; used for garnish
*Kimchi is often served with this dish


Slice up all veggies, meats & then scramble egg. Coat the wok or skillet with as few tablespoons of oil as you need, a well seasoned wok won't require much. Cook egg(s) quickly over med high heat, turning to coat the bottom of the wok or skillet. Slice the egg into thin strips & cover to keep warm while preparing the rest of the meat & vegetables. Quickly cook vegetables & garlic adding in the more dense vegetables first to cook them a little longer & finally ending with the chard or leafy vegetables & then adding the meat which is pre-cooked & only needs to be reheated with the rest of the dish. Toss in dash of salt & sprinkle with sesame seeds. Place this in serving dish with eggs over top of meats & vegetables then garnish cucumber and Korean Spicy Sauce* Kimchi or Siracha Sauce. This dish can be expanded easily to accomplish feeding many with very few ingredients. Multiplying the egg or veggies can expand this meal quite easily. There are so many versions of this dish, be creative & add what you have on hand.  This recipe yields 2 large adult portions for more just multiply ingredients. 


*For true Korean Kimchi check at the local Asian Market
**Korean Spicy Sauce can be easily made at home:
5 Tbsp Kochujang (Korean chili pepper paste)
2 Tbsp agave nectar or honey
3 Tbsp rice wine vinegar
2 tsp minced garlic
1 tsp sesame oil
Mix all ingredients thinning out with water if it is too thick, store remaining sauce in refrigerator.

Tuesday, February 14, 2012

Granola: a Lovin Spoonful for Heart Health Month

February is American Heart Health month. It’s true that heart disease can be genetic, but often it is not. Cigarette smoking, diabetes, hypertension, obesity and hyperlipidemia are other factors that contribute significantly to heart disease risk.

With the many choices we make food wise during the day the best way to start a healthy day is with a good foundation at breakfast.  Along with the regular breakfast items we eat at our house I recently added a Paleo Granola recipe. Bytes from Texas tried a granola recipe that she was raving about & let me know that Mexican vanilla is the deal breaker, basically. With a good quality vanilla very little is missed out of the "old school granolas" which when bought at a store in the prepackaged boxes (on that long cereal aisle) contain large amounts of sugars, grains & extra preservatives none of us need.  There is no risk of high fructose corn syrup when you take a small amount of time to make your own granola. I have made 3 batches of this recently & in fact have seen the Mister eating a handful of my granola now versus some of his previous less healthy alternatives.  I made mixed up my first granola & tossed in pepitas (shelled pumpkin seeds) & put in dried bits of apricot.  Logically you may say it is easier to pick up a box but this recipe is healthier, easy & seriously cheaper when you buy small amounts of nuts & fruits in the bulk foods area of your local grocer.  Enjoy this recipe, it's a small joy to make your first recipe of homemade Granola & realize it's been that easy all along.  Buen Provecho, my friends! 


For a Heart Healthy  start to the day try this with coconut or almond milk.
Paleo Granola
2 cups toasted coconut (unsweetened)
1/2 cup pumpkin seed kernels
1/2 cup sliced raw almonds
1/2 cup raw sunflower seeds
3/4 cup agave syrup*
1/3 cup coconut oil
1 tsp Mexican vanilla (or very good quality vanilla)
1/2 cup raisins or dried cranberries
1/2 cup dried apple, roughly chopped
1/2 cup pecans or nuts of choice
Preheat oven to 350 degrees F.Combine oats, pumpkin seed kernels, chopped almonds, and sunflower seed kernels in a large bowl.
In a saucepan on the stove, melt together the agave, coconut oil and vanilla, stirring occasionally, until combined.
Pour agave mixture over oat mixture and stir to coat.
Spread granola mixture into baking pans (metal pans cook faster than glass). Bake for 20 minutes, stirring every 5 minutes. I spread mine on foil on the counter for several hours or overnight so it cools well, then store in airtight container.
Enjoy granola with coconut milk or almond butter or fruit! *I have made this with or without the agave, it is as good without as with the syrup.

Any fruit or nut mixture will work, try new combinations.

Sunday, February 12, 2012

Scotch Eggs Anyone?

Scotch Eggs, portable & quintessentially  British


What is a Scotch Egg many might ask? I've been a fan of this British food item since I was a student & traveled to the UK many years ago. I remember the puzzled looks on my American travel companions faces. My first Scotch Egg was crisp on the outside, it had a well cooked egg at the center & was altogether delicious. Back then it was a typical fare for corner pubs, well known food halls such as Selfridge's or Harrod's & small corner grocers across England. Jump forward to 4 years ago when my daughter & I attended the Celtic Festival in Austin Texas. My daughter was turned off when I purchased a Scotch Egg from a pseudo British food tent. I do admit the same food tent sold "Gator on a stick".... however it was every bit as tasty as I remembered eating across the pond in my youth. She refused to partake in the tasty bit of Celtic fare & made jabs at what odd bits of meats may have been inside the tasty tidbit. Who can blame her when the establishment sold other odd meats?


The Scotch egg has quite the history though. Fortnum & Mason’s archives show that it invented the Scotch Egg first. Back in the 1730s, Fortnum’s was hard at work creating foods to suit its well-heeled customers, whose far-flung families could only be reached by long-distance carriage rides. Mind you, the ultra portable Sandwich wasn't on the foodie scene till 1762 and food to travel with were in demand. Fortnum’s came up with a number of ideas, including wrapping a hard-boiled egg; which in those days was probably a pullet’s egg in sausage meat with a coating of breadcrumbs. Substantial, tasty and full of protein, it was an excellent way to stave off hunger pangs. The name, by the way, has nothing to do with Scotland; "scotched" was merely another word for processed. In the 21st century the Scotch Egg has come into a more accepted & even regaled status. In Japan "skotchi eggu" are a staple of Japanese new year. As is typical when a simple food spends centuries on the culinary journey, the newer versions take some exciting detours. The British foodies now report the use of vegan sausage, exotic ostrich meat & venison as well as foi gras wrapped around Scotch Egg. However you may enjoy this portable protein, it's worth a taste even if for the first time! I made mine without the use bread crumbs though the substitution of almond meal makes the outer crust quite crisp & gives a very nice texture. 


Scotch Eggs


4 boiled eggs, shelled & chilled
1 lb turkey or pork sausage *see below recipe if you don't buy prepared sausage
2 cups Almond meal
1 raw egg for the wash


Dip the shelled boiled eggs in water then lightly coat in almond meal. Wrap the entire Egg up inside 1/4 of the sausage meat. I flattened the sausage with my palm then wrapped the egg up in the sausage smoothing the meat around the egg evenly.  Once all 4 eggs are covered in the sausage meat, beat the raw egg, use a brush to coat the outside of the sausage wrapped eggs & then roll them in the almond meal.  Fry in medium sized skillet over medium heat in about 1/2 inch grape seed oil till browned on the outside (10-15 min).  Transfer to plate with paper towels to soak up any excess oil.  When all scotch eggs are warmed they are delicious but they are just as tasty when they are chilled. I enjoy mine with mustard but I've seen them eaten with Siracha sauce, 


Wrap sausage around the boiled egg, then roll in almond meal.


*For making your own sausage or mince:
1 lb ground lean pork or 1 lb ground turkey
½ teaspoon salt
1 teaspoon rubbed sage
½ teaspoon red pepper
½ teaspoon thyme

Saturday, February 4, 2012

Homemade Soup Day, Let's Celebrate

Hearing that National Homemade Soup Day was arriving I was wondering what Winter soup I'd make to have for a tummy warming treat for me & the Mister. I have to admit I'd eat soup almost any day of the year but we've had an unseasonably warm Winter here in Texas. I had to find just the right soup recipe to make since our temperatures have been so moderate of late. I have enjoyed African Peanut Soup many times & like the spicy quality as well rich creaminess of that dish. In an urge to avoid legumes right now at our house I opted for a more veggie based soup version with a slight nod to my favorite African Peanut Soups of the past. I used homemade pumpkin puree I had from oven roasting a Fall pumpkin. The flavors from oven roasting are slightly different from the canned version so if given the opportunity to use fresh please try it! Bowls up & enjoy National Homemade Soup Day today, February 4.


Pumpkin Soup
1 medium onion
2 stalks celery
4 cloves garlic
2 teaspoons grapeseed, coconut or olive oil
2 cups chicken or vegetable stock
1 large can of whole tomatoes, do not drain
1/2 cup creamy almond butter or peanut butter
1 (29 ounce) can pure pumpkin puree (*or process your own pumpkin & freeze ahead of time in Fall)
1- 13.5 oz can coconut milk
1 teaspoon chili powder
1 teaspoon smoked paprika
1/2 teaspoon curry powder
salt & pepper
Directions:


Finely mince the onion and celery.
Either use a garlic press for the garlic or mince extremely fine.
Melt the oil in your stock pot and sauté the onion, celery and garlic for about 5 minutes or until soft.
Add the stock, followed by the remaining indgredients, whisking the mixture so it remains smooth.
Simmer for about 20 minutes and serve.


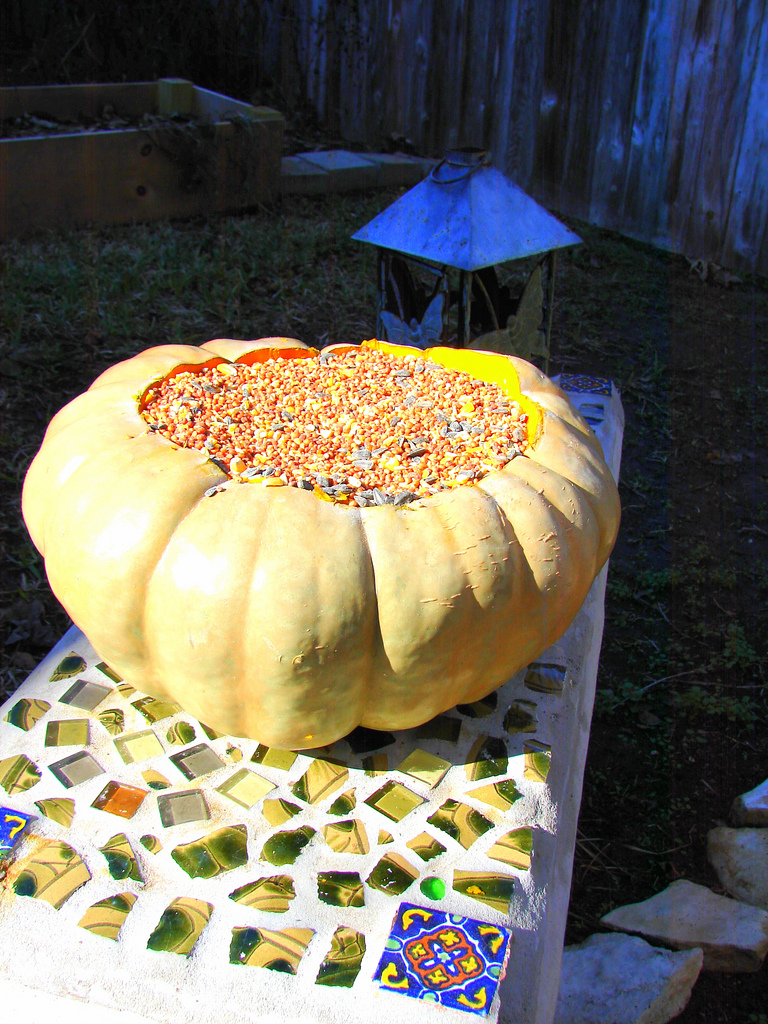
I served this soup topped with toasted pumpkin seeds & a sprig of fresh rosemary. I tossed the seeds with 2 tsp oil & stirred in Wasabi Fumi Furikake seasoning & roasted for 25 min @ 350 stirring every 5 minutes. The seasoning adds a different kick to the pumpkin seeds. Glad I tried it, I will certainly be utilizing the seasoning again. *Fall pumpkins never go to waste in my house.  We roast, stuff & re-purposed our pumpkins if not for us then for our wild critters.  See the re-purposed pumpkin below.
Fill a pumpkin with bird seed for a critter treat!

Tuesday, January 17, 2012

Salmon Patties & Fish Stories

As a kid my adventure loving folks moved us from San Antonio Texas where the average summer temperature often registers in the triple digits to Alaska where the lengthy winter months are cold & temperatures average well below freezing. The trade off for such a harsh winter besides the spectacular beauty & unbridled spirit of the 49th state is the abundant fish & game. Alaskans were doing sustainable living long before it was the "in" thing to do. Once my father discovered Salmon fishing it became a family event during the Salmon fishing season. Coming from Texas where the fresh water fish no where near approached the size of Salmon it was a new frontier in the kitchen. My parents canned salmon, baked, bbq'd, broiled, smoked & made salmon a regular part of our diet. At times it seemed as though we'd eaten oceans of Salmon & fought of swarms of Alaskan mosquitos all summer long.  My fondness for salmon wore off probably just shy of my pre-teen years. As an adult I gained a new enjoyment of Alaskan Salmon, quite possibly because Texas is a very long way from Alaska & absence does make the heart grow fonder.  No longer able to roll out of bed on a Saturday morning for an early fishing run as we did all those many years ago I'd do just about anything to relive those days again.  Instead I have to depend upon a good source of wild caught fresh or canned salmon when I feel a yearning for Salmon coming on.  The salmon pattie recipe I make is closely linked to Martha Stewart's Asian Salmon Pattie recipe here:  She uses fresh salmon however I often have a can or two of salmon on hand. What I like from Martha's recipe is that she uses no cracker or bread crumbs as many recipes do.  This recipe lets the egg become the binding agent & the flavors of ginger give a nice Asian hint without overwhelming the pattie. Not if but when I travel to Alaska again, I'm going Salmon fishing & I will enjoy it even more as an adult. Till then I'm having a Salmon Pattie & remembering all those fishing trips of my childhood~
Salmon  fishing, a family event (our  poodle "Jacques" is even  there for the photo)


Alaska Salmon Patties


3- 6 oz cans of wild caught Alaskan Salmon
2 eggs, beaten
3 Tbsp diced green onion tops
1 tsp dried dill
1 tsp fresh minced ginger
My sister & I were quite the Salmon fishing duo back in the day there alongside our family VW Vanagon.


1 tsp fresh ground black pepper
pinch of sea salt & pinch of celery salt


Drain Salmon well, loosely mix in the rest of the ingredients careful not to break up the salmon too much.  Cook in large skillet over medium high heat in oil of choice.  Drop Salmon mixture by spoonful into hot skillet. Let cook thoroughly turning over once so each side is golden brown. If you turn or touch the patties too much as they are cooking they tend to fall apart.  Just place them in the hot skillet, leave them alone till brown around the edges & then turn gently. A total of about 5-6 minutes should do it. Serve warm with lemon wedges, green onion tops or a dollop of hot Asian Siracha sauce as I did.

Tuesday, November 22, 2011

A Texas to Mexico Paleo~Style Stuffed Squash


As our family prepares to head to South Texas for the Thanksgiving holiday where quiet relaxing vistas will keep us spellbound for a few days & give us all a certain spiritual nourishment. This fall I've been so enamored with the selection of winter squashes & pumpkins I've seen. I've seen more variety & colorful selection than ever. Not for the first time this season I have cooked with Carnival Squash. It is a mild, squash in the size range of an Acorn Squash.  I enjoy baking Carnival Squash with savory spices however many cooks bake these with a much sweeter result using winter spices such cloves, cinnamon & agave or honey. The colorful skin makes this a nice centerpiece till you are ready to use it regardless of how it is baked. My version of the stuffed squash gives a nod to the hunter-gatherer diet paying attention to exclude grains, legumes, dairy products, salt & refined sugar. *winter squash are:Fat-free and sodium-free, a three-fourths cup serving provides fiber, carbohydrates, protein, vitamin A, vitamin C, calcium, iron and thirty calories. Darker colored squashes have the most beta carotene.  


Carnival Squash are a colorful winter squash sometimes labeled acorn squash.


 Creamy mild flesh of the squash makes a nice complement to the spicy chili sauce
Stuffed Carnival Squash with Mushroom & Red Chili Chicken


2 Carnival Squash, halved, seeded, rubbed with 1 tablespoon oil
1/2 lb ground chicken
1/2 lb lean chicken sausage (I found mine at Sprouts, remove casing if it has casing)
1/4 diced onion
1 tsp minced garlic
8 oz white mushrooms, sliced
*1/2 cup Red Chili Sauce made with Guajillo chilis see recipe link
Recipe here from previous blog post on *Lunch Box for One
2 tablespoon chopped flat leave parsley


Bake the 2 Carnival Squash cut into halves @ 375 for 25 minutes or till crispy golden around edge & flesh tests tender.  Set aside &  prepare Mushroom & Chicken stuffing. Saute onion & garlic in skillet till translucent, add the chicken sausage & ground chicken. Cook till chicken is no longer pink & slightly browned.  Add in mushrooms, cook till tender then add the Red Chili Sauce, mix, add parsley & remove from heat.  Spoon into Squash halves & return to 375 oven for 10 minutes till heated throughly.  Serve immediately.  Any leftover stuffing I serve alongside the filled squash halves.
Leftover Mushroom Red Chili Chicken Filling is good alone 

Monday, November 21, 2011

Paleo Wedding Soup & a Devilish Egg Appetizer


When I'm lucky enough to have true farm fresh eggs, I find a variety of ways to fit them into meals at our home. Eggs aren't just for breakfast as anyone in my house can tell you. Eggs are a low cost cost way to add a naturally good source of vitamin D & protein. This past weekend I made both a soup as well as a quick dozen Deviled Eggs using some of my farm fresh eggs my mother brought me from Uvalde County in South Texas.   


This soup gets the name as a "married soup" since it is a marriage of meat & greens. The traditional name is actually Minestra Maritata & the origins are both Italian & Spanish, whatever the origins are the soup is a perfect Fall meal. Many recipes use bread crumbs to make the meat balls but if you have fresh meat, add the egg & chill the meatballs prior to dropping them in the soup they will be fine. I've even baked my meatballs to get them nice & brown when I have time. Many traditional recipes for this soup soup have streaks of egg-and-cheese scrambles borrowed from the Roman egg-drop soup Stracciatella. The egg adds a certain hearty quality which makes this a very nice one dish meal.


Primal Italian Wedding Soup


Meatballs:
1 small onion, grated
1/3 cup chopped fresh Italian parsley
1 large egg
1 teaspoon minced garlic
8 ounces turkey or chicken sausage
8 ounces ground turkey
Freshly ground black pepper
Soup:
12 cups low-sodium chicken broth
1 pound spinach, coarsely chopped (1 pound of kale is a good substitution)
2 small turnips, diced into 1/4 in pieces
2 large eggs
2 tablespoon freshly grated Parmesan, for garnish*
Salt and freshly ground black pepper
Directions
To make the meatballs: Stir the first 4 ingredients in a large bowl to blend. Stir in the sausage & turkey. Using 1 1/2 teaspoons for each, shape the meat mixture into 1-inch-diameter meatballs. Place on a baking sheet.


To make the soup: Bring the broth to a boil in a large pot over medium-high heat. Add the meatballs and spinach, turnips and simmer until the meatballs are cooked through and the spinach or kale is tender, about 8 minutes. Whisk the eggs in a medium bowl to blend. Stir the soup in a circular motion. Gradually drizzle the egg into the moving broth, stirring gently with a fork to form thin stands of egg, about 1 minute. Season the soup to taste with salt and pepper.


Ladle the soup into bowls and serve. *Finish soup with parmesan cheese if desired. We didn't have this but it is traditional garnish for the soup. I am almost certain no one else puts turnips in Wedding Soup but I had some garden fresh turnips & thought they would be a nice addition to the soup.


Devilish Deviled Eggs
6 Eggs, hard boiled
2 Tablespoons Mayonnaise
3-4 Tablespoons Jalapeno Mustard* (or any spicy version you prefer)
2 teaspoons diced fresh oregano
1 teaspoon minced garlic
1/2 teaspoon finely minced shallots or white onion
dash of sea salt according to taste


Cut boiled eggs into halves lengthwise, scoop out inside reserving whites on platter. Mash & break up all lumps in the hard boiled egg yolks, then add next 6 ingredients. Garnish tops of eggs with extra oregano leaves or sprinkle with dill or any fresh herbs you may enjoy. *I used Woeber's Jalapeno Mustard 

Sunday, November 6, 2011

Yes, Soup Weather again! Hlelem a versitile Tunisian Soup is back on the menu.

At the first sign of a cold front in Texas I believe across the United State a loud cheer could be heard coming from this Southern State. Texas had record heat & drought this summer. Hottest, driest, longest since 1885 in fact Wichita Falls had 100 days over 100. As a state it certainly felt like we simmered & stewed all summer long (at times in our own skins...). Salads and lighter cooler meals have been the order of the season for months. This past week when temperatures dropped to freezing overnight it felt like it was okay to drag out the soup pots & dust off the crock pots once again. What is nauseating to think of when it is 109* is downright cheerful when the temperatures seem normal once again. I always feel better when I can make a pot of soup. Earthy, rich & soothing soups make me feel comforted & tend to remind me of soups my mother would make when I was a kid. This is a traditional Tunisian soup inspired by Martha Rose Shulman's version from her Mediterranean Harvest recipes. Some of you know this is not my first post of Hlelem,  I've actually made it before with all the beans however I'm on a eating lifestyle now which departs from some of the legumes & pastas so I've changed things up a bit. For vegetarian diets this is good with vegetable broth, for those who want to add a lean protein; I expanded this soup on day 2 with lean ground meat. Enjoy & be soothed as I was.
Hlelem soup hits the spot on a cool fall evening.

Hlelem (Tunisian Vegetable Soup)

yields 2 quarts

2 tablespoons olive oil
4 teaspoons garlic, minced
1/4 cup celery stalk, large outer veins trimmed, diced
1 large red or green bell pepper, seeded, diced
3 cups fresh or canned tomatoes, diced
1/4 cup onion, minced
1 quart chicken broth
6 tablespoons tomato paste
2/3 cup canned chickpeas, drained*check below for my new substitution without legumes
7 cups Swiss chard leaves, stems removed and cut into 1-inch pieces, leaves shredded, lightly packed
1/2 cup angel hair pasta or fideo, dry, approx. 1/3 c.
1/2 tablespoon red curry paste or Harissa
Salt, to taste
Freshly ground black pepper, to taste
1/4 cup parsley, chopped
1/4 cup radishes, grated
wedges of lime or lemon

Heat the olive oil in a soup pot over medium heat. Add the garlic, celery, and onion. Cook, stirring occasionally, until the onion is translucent, about 5 to 7 minutes.

Combine 1/2 cup of the reserved chickpea liquid with the broth, reserved bean liquid, and the tomato paste to the pot. Slowly stir getting the tomato past lumps worked out or till well blended and bring to a simmer for 10 minutes.

Approximately 10 minutes before serving, add chickpeas or alternative veggies such as butternut squash*, the Swiss chard, and the pasta. Simmer until the pasta and chard stems are tender, about 10 minutes.

Add the Harissa and stir until blended. Season to taste with the salt and pepper. Garnish with the chopped parsley, radish & serve with a wedge of lemon or lime.

*I added 1 cup diced butternut squash instead of the chick peas although the chick peas are more traditional in this soup.  Also I would now omit the fideo pasta to cut out the gluten. You can add whatever vegetables are local or seasonal. Rutabaga & Sweet potato are nice winter/fall substitutions.The radishes as a garnish add a nice zesty punch.


A spicy addition to Hlelem Soup this is very similar to Red Curry paste.
Harissa comes in small cans and can be found in a lot of supermarkets and Mediterranean groceries. It is a Tunisian hot sauce or paste usually made with hot chiles, garlic, cumin, coriander, caraway and olive oil.  I also added lean ground meat the second day to this soup.


For my previous Hlelem recipe in the Crock pot please check here for my previous blog post.

Sunday, October 30, 2011

Finding my Sunny Side Up!

Jello no matter what the flavor gets old in a hurry!

 I had unexpected surgery 2 weeks ago & it has truly made me reinvent my meals so I can tolerate some of my favorite foods.  My doctor told me next to nothing about post surgery diet and I've been on my own with figuring out what works for me right now. I've had oceans of Jello & yards of saltine crackers so I'm just trying to hit my stride on the culinary side. I guess I'm searching for my sunny side up as it were! Still sore & dealing with stitches I'm getting the hang of what works & what still has meal appeal to me as well as my family. I had already pared down my dietary meanderings omitting foods such as bread, all dairy foods, red-meat etc. Having said that I'm sticking pretty close to the straight & narrow when it comes to eating fruits, veggies & lean proteins. I hate people who preach about the new blah, blah, blah diet that they love which really made them who they are, Zzzzz....  Having said that though I'm feeling pretty good about a few new recipes I've added & thanks to a couple of good blogs I'm finding that many of the best things are still in the que for meal preps. I found Sarah Fragroso's Everyday Paleo to be very helpful. I'm not saying I will stick to a strict Paleo diet but she has some great recipes & I think a Texas to Mexico kitchen can only improve with a little Paleo restructure.
Egg Muffins are a good choice for weekend brunches.

Egg Muffins
1lb Ground Turkey or turkey/chicken sausage
3 cups fresh Spinach (packed), cleaned & chopped
1 cup grape or cherry tomatoes, halved
mushrooms, sliced
32 oz carton Egg Whites*
1 tsp. cayenne
Sea Salt and Pepper to taste

Preheat oven to 375. Cook Turkey, season with cayenne, salt & pepper to taste. Set aside turkey, wilt spinach in skillet. Try not to over cook, I just toss spinach in skillet till barely wilted & remove from heat. Into the bottom of muffin cups (you may use silicon muffin liners or just use a vegetable oil spray in the muffin pan) I spooned a Tbsp of meat into each muffin tin, layer in veggies then pour in egg whites leaving 1/3 inch space at top so egg muffins can rise as they bake. Bake at 375* for 25 min or till they are slightly browned & spring back when touched. Cool slightly & serve. These are good stored & I've even frozen them & heated them in the microwave for a quick breakfast.*I did not use the entire carton of Egg whites & you can also use 12-14 whole eggs in place.  Experiment with different veggies & type of egg product. ie: egg beaters, whites or whole eggs.
Any favorite Veggies can be used. I've used Asparagus & Broccoli


This recipe is easy to bake for the work week ahead.

Monday, August 15, 2011

Homemade Prickly Pear Sauce, Minus a few Stickers!


For the first time in several years I picked fresh Prickly Pear fruit. As I drove up the rural ranch road out in Uvalde County I was struck by the colorful "tunas" dotting the tops of the Prickly Pear. Considering the number of cactus plants I saw, it is no wonder I was compelled to pick 10 pounds of Prickly Pear Tunas so I could make Prickly Pear Sauce. This prickly pear sauce recipe a friend gave to me years ago. It was from a cookbook he had with old recipes from Mexico. I've also found it several times since then on websites & in several cookbooks. It can be easily increased.

The Prickly Pear fruits are very sweet/tart.  Depending on the level of ripeness the sweet factor can be more to the tart side. When I lived in Mexico the street vendors used to peel the fruits & sell bags of them for about 20 pesos.  Considering the areas I see Prickly Pear growing in Texas & across the Southwest there is no end to harvesting opportunities. Be cautious though; as I picked the fruit out in rural Uvalde County my mother mentioned that rats liked to build nests at the bottom of Prickly Pear Patches which also tend to attract snakes.  The morning I picked the fruit last Monday I noticed a nest almost 4 feet wide at the base of one of the Prickly Pear.  I was alert & walked very carefully.  Seriously, I thought: "no snake will cheat me out of a Prickly Pear Sauce".  I was also of the mindset if that proved wrong I could sprint quickly without spilling too many fruits!!

To harvest  Cactus fruit  wear heavy-duty protective gloves.


Some of the health benefits associated with prickly pear:
Immune support
Diabetes
Obesity
Helps manage cholesterol

Some of the nutrients found in prickly pear cactus:
Flavonoids | Pectin | Vitamin A | Vitamin B | Vitamin C
Once peeled the Prickly Pear can be eaten either fresh, frozen, or cooked as I have into a sauce which makes a nice marinade, basis for a colorful salad dressing or my personal fave: add a colorful kick to a margarita.  The raw fruit tastes somewhere between kiwi or strawberry with a slight acidic tang.(Use gloves & tongs to handle the fresh tunas & when all else fails pick those tiny stickers out with tweezers. The times I have handled the tunas I've always had a few get into my finger tips.)
Prickly Pear Sauce also adds a tangy kick to Margaritas!


Nopal (Prickly Pear) Sauce

*16 fresh prickly pears
*1/2 Cup sugar
*1 Tbs. lime juice
*1 Tbs. orange liqueur

Remove rind from prickly pears by cutting off both ends and running a slice down both sides. If ripe, the rind will pull off easily. Chop prickly pear into 1-inch pieces and place in a blender. Blend on medium-high until you have a puree. Strain through a cheesecloth or a food mill, this will remove almost all of the tiny stone like seeds. Reserve both the juice and puree. Put 2 cups of the prickly pear juice in a medium-sized saucepan with the sugar. Cook over medium heat until mixture is reduced by half. Remove from heat. Add 1 cup of pureed prickly pear, the lime juice & orange (or lemon) liqueur. Stir well. Refrigerate for 4 hours before serving. **Once we reduced the sauce by half & it thickened slightely it was put into pint canning jars & processed in a water bath for 15 min.

Monday, July 25, 2011

Keeping Cool with Los Cocos Fruit Ceviche

Summer heat is setting records in 2011
 The scorching sun has sent the summer temperatures well over 100 for more than 41 days, only considered cool in a "I survived that kind of way",  I'm all for prepping meals with little or no oven time right now. To heck with conventional cooking, please don't turn up the heat.  The Summer of 2011 could almost be considered the Summer of Ceviche for our family. We've had many endless variety in this popular Latin American dish. This fruity Ceviche version is named after one of my favorite Fruiteria stands in Monterrey Mexico. I've only had fruit cups there at Los Cocos but if they had a Ceviche with fruit it would taste  something like my version. Make a Ceviche with whatever seafood is on hand and be liberal with choice of fruits. Ceviche is typically made from fresh raw fish marinated in citrus juices & spiced with chili peppers. Our family enjoys Ceviche & it seems like the perfect way to cool things down at the end of a long hot day. Follow it with a crisp wine or cold Mexican beer & it's a meal. Salute!


Los Cocos Fruit Ceviche
1 pound medium-size raw shrimp, shelled and veined

1 red or yellow bell pepper, diced
1/4 cup diced yellow onion
1 jalapeno, minced
1/2cup lime juice, divided in half
3 tbsp ketchup
1 tablespoon olive oil
1/4 cup orange juice
1/4 cup chopped cilantro
1 cup melon, cubed
1 avocado, diced
2 kiwi fruit, skinned & diced
1 cup pineapple diced, juice reserved
1 orange, cut in sections and diced, juice reserved
Salt and pepper**

Directions

Blanch the shrimp in boiling water until no longer translucent, 1 to 2 minutes. Drain & quickly cool down in iced water. (Chill shrimp approx 30 min)

Combine the shrimp, red or yellow pepper, cilantro, jalapeno, and 1/4 c.lime juice in a large bowl. Refrigerate, covered, for 2 to 3 hours, stirring occasionally. Drain off most of the liquid.

Whisk together the olive oil, ketchup, all citrus juice, and cilantro. Pour over shrimp and add diced avocado, melon, (add all fruits at this time), orange pieces &  pineapple. Season with salt and pepper. Refrigerate until ready to serve.**Fruit juices are natural tenderizing agents so remember to prepare approx. what will be consumed in given meal.  The shrimp tend to keep tenderizing with the fruit juices & become mushy in more than 24 hrs.

Wednesday, July 20, 2011

Tortilla Espanola, in Spain it's a Spanish Omelette~

In Mexico Tortillas are disks of either corn or flour flat bread to be served with food tucked into them.  In Spain a Tortilla is an entirely different matter. The Espanola is an egg dish filled with potatoes & served either hot or cold.  It may be served as an appetizer in a Tapas bar or a main dish at home.  My first education about the Spanish Tortilla was in a Miami Beach Tapas restaurant believe it or not. (at last count Miami has at least 8 Tapas restaurants) My husband had lived in Spain & was thrilled to find a Tapas restaurant & introduce the family to one of his favorite foods.  Since then I have been captivated by this easy mainstream dish from Spain. Tales of this dish differ on where the Tortilla Espanola originated however all seem to agree that it dates back to the early 1800's. Historically speaking it was said to gain popularity during wartime as a way to feed a crowd with few handy & wholesome ingredients. The dish is both easy & quick to put on the table.


Tortilla Espanola ~ Spanish Tortilla
6-7 medium potatoes, peeled
1 whole yellow onion, sliced
5-6 large eggs
1 cup Spanish Chorizo, sliced into rounds
3  cups loosely chopped Swiss Chard
2-3 cups of olive oil for pan frying
Salt & Pepper to taste

Cut the peeled potatoes in half lengthwise. Then, with the flat side on the cutting surface, slice the potato in pieces approximately 1/8" thick. If you slice them a bit thick, don’t worry – it will simply take a bit longer for them to cook.

Peel and chop the onion into 1/4" pieces. Put potatoes and onions into a bowl and mix them together. Salt the mixture.

In a large, heavy, non-stick frying pan, heat the olive oil on medium high heat. Carefully place the potato and onion mixture into the frying pan, spreading them evenly over the surface. The oil should almost cover the potatoes. You may need to turn down the heat slightly, so the potatoes do not burn, next add chorizo slices & cook 3-4 more minutes or till sausage browns slightly.

Leave in pan until the potatoes are cooked. If you can poke a piece of potato with a spatula and it easily breaks in two, your potatoes are done. Remove from the pan with a slotted spoon or spatula and allow oil to drain.

Crack the eggs into a large mixing bowl and beat by hand with a whisk or fork. Pour in the potato onion mixture. Mix together with a large spoon.

Pour 1-2 Tbsp of olive oil into a medium, frying pan (aprox. 9-10”) and heat on medium heat. When hot, stir the potato onion mixture once more and “pour” into the pan and spread out evenly. Allow the egg to cook around the edges. Then you can carefully lift up one side of the omelet to check if the egg has slightly “browned.” The inside of the mixture should not be completely cooked and the egg will still be runny.

When the mixture has browned on the bottom, you are ready to turn it over to cook the other side. Take the frying pan to a sink. Place a large dinner plate (12”) upside down over the frying pan. With one hand on the frying pan handle and the other on top of the plate to hold it steady, quickly turn the frying pan over and the omelet will “fall” onto the plate. Place the frying pan back on the range and put just enough oil to cover the bottom and sides of the pan. Let the pan warm for 30 seconds or so. Now slide the omelet into the frying pan. Add chopped swiss chard & use the spatula to shape the sides of the omelet. Let the omelet cook for 3-4 minutes. Turn the heat off and let the tortilla sit in the pan for 2 minutes. If chard needs wilting more broil it for 1-2 minutes or till nicely wilted.

Slide the omelet onto a plate to serve. If eating as a main course, cut the omelet into 6-8 pieces like a pie. Serve a wedge of the Tortilla with sliced pickle, marinated mushrooms, fruit or a piece of crusty bread & a glass of wine.

Wednesday, April 6, 2011

Comfort Foods take us down memory lane.

Familiar house numbers on Nana's San Antonio home.


Comfort whether it pertains to a place, a food or feeling one gets taking a trip down memory lane. It's something that makes us all feel an emotion about the person place or thing.  Last year my Nana's house sold in San Antonio Texas & it was a bittersweet feeling.  Good because the family who bought the home knew my grandmother & loved the property. Bittersweet in that the empty house brought back so many memories that somehow would never again be so visceral or so easily touched.  Emotions & memories are like that.  Touching on something deep within which somehow make us connected to that which we are from.  Comfort foods are like that also.  Comfort foods connect us to a person or event which gets relived even in a tiny form when we experience it again.  I recently found a new twist on an old favorite.
Ground Smoked Chipotle Pepper adds a smoky quality


So normally I don't just take a recipe I find in a food magazine then just revamp & repost.  Something within me yearns for a little more creativity but, how can one really improve on something as great as mac & cheese? The recent cover dish on the March issue of Bon Appetit has been in my focus since I saw it.  B A food writers have an entire article dedicated to mac & cheese.  True, mac & cheese is what every red blooded American kid grew to love & crave no matter what era you grew up in post World War II.  Even if it was that familiar blue box of Kraft Macaroni & Cheese & it somehow made an episode of the Brady Bunch last a wee bit longer. (Ha! Guess I'm dating myself with that one...) I left behind my boxed macaroni & cheese some years ago when I realized homemade mac & cheese is better than anything pre-packaged.  My version of the Pimento Mac & Cheese has a bit more heat in it than the original version may have.  I found a nice ground smoky chipotle pepper.  At it's outset it has a nice smoky scent imparting a nice touch of hot. Whether you want to play with the recipe as I did or just make the mac & cheese ingredient for ingredient it's by far one of my favorite macaroni & cheese recipe's I've had in some time. I also opted to roast my red bell pepper since I like the flavor of roasted bell pepper. Can't wait to see what strikes my fancy in the April issue. Bon Appetit!


Pimento Macaroni & Cheese

  • 1 7- to 8-ounce red bell pepper. (After roasting seed & cut into 1-inch pieces.)
  • 2 garlic cloves, halved, divided
  • 1/2 cup panko (Japanese breadcrumbs)
  • 3 tablespoons unsalted butter, room temperature, divided
  • 1/2 cup freshly grated Parmesan cheese, divided
  • 3/4 cup drained mild Peppadew peppers in brine, 1 tablespoon brine reserved
  • 1/4 teaspoon ground chipotle chiles
  • 1 1/4 cups (packed) coarsely grated extra-sharp cheddar cheese
  • 1 cup (packed) coarsely grated whole-milk mozzarella
  • 8 ounces medium shell pasta or gemelli
  • ingredient info

    Peppadew peppers are available in jars or in the deli section at some supermarkets, at specialty foods stores, and from peppadew.com.

    Look for panko at supermarkets and at Asian markets. Ground Chipotle Chile peppers are available in the spice section of supermarkets and at Latin markets.

Preparation

  • Broil or roast in the oven the garlic & red bell pepper. Simmer until pepper is soft, about 15 minutes.
  • Toast panko in skillet over medium-high heat until golden, stirring often, 5 to 6 minutes. Transfer to bowl; cool to lukewarm. Rub 1 tablespoon butter into crumbs to coat. Mix in 1/4 cup Parmesan.
  • Transfer bell pepper mixture to processor. Add Peppadews and 1 tablespoon brine, 2 tablespoons butter, ground chiles, and 1/2 garlic clove; then add cheddar and 1/4 cup Parmesan. Blend until sauce is smooth; season to taste with salt and pepper.
  • Preheat oven to 400°F. Butter 8-cup baking dish (or 6 individual dishes). Cook pasta in pot of boiling salted water until tender but still firm to bite. Drain; return to pot. Stir sauce and mozzarella into pasta. Season with salt and pepper. Spoon pasta into dish. Sprinkle with crumb topping.
  • Bake pasta until topping is crisp and sauce is bubbling, about 25 minutes (15 for individual). Let stand 10 minutes.